Service Catalog "Try in Portal" button
When building or modifying a Catalog Item in ServiceNow, the Try it button is fantastic for allowing you to quickly and easily see what the changes you’ve made look like in your development environment. This is a crucial tool for testing!
However, as many of you will no doubt be aware, there are significant differences between the “classic” UI, and the Service Portal UI. Certain field types look and behave differently. Some even have different APIs for interacting with them in the Service Portal!
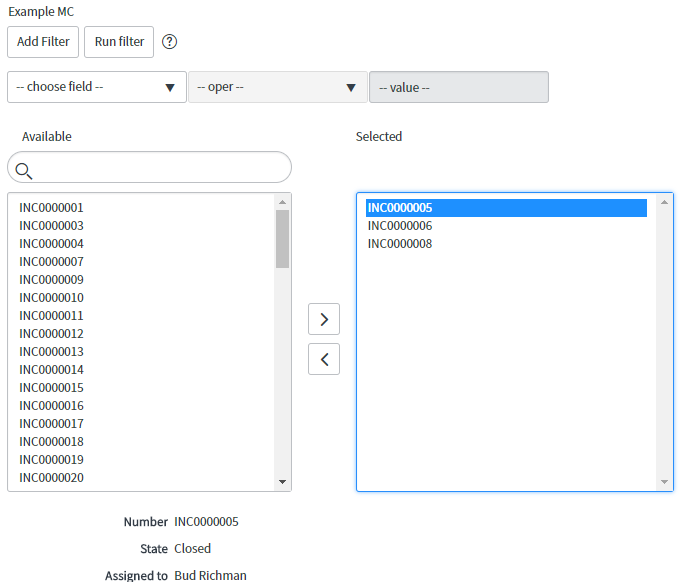 List collector catalog variable in the classic view
 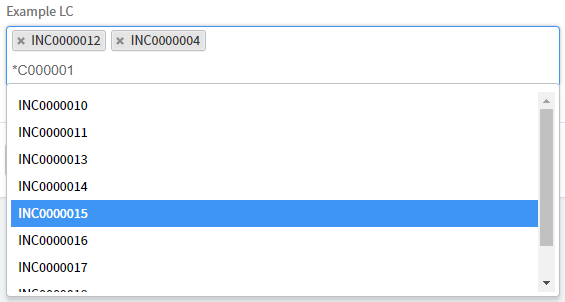 List collector catalog variable in the Service Portal
For this reason, it’s almost always important to be able to quickly and easily view your catalog items in the Service Portal as you’re building them, as well as in the classic view. Unfortunately, there is for some reason no out-of-box way to do this!
To remedy this, our Service Portal developer (Kim) built a custom “Try in Portal” UI Action, which does just what you might expect - it allows you to preview your catalog item in the Service Portal.
What’s more, it allows you to actually choose which Portal you’d like to view the catalog item in! This way, you can verify that any themes, JS Includes or other client-side code you have running on that particular Service Portal.
There are two components to this functionality: a UI Action, and a UI Page (inspired by the “Try it” button on Service Portal pages).
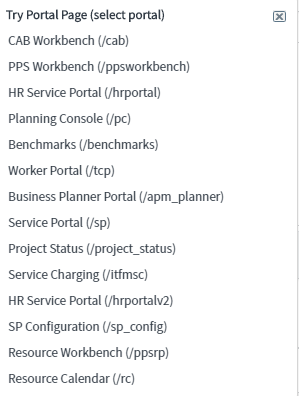
When clicking Try in Portal on a Catalog Item, you’ll be presented with a dialog which asks you to select which portal you’d like to view the catalog item in (see the screenshot on the left).
Building the UI Action
The UI Action is pretty simple. Just create a new UI Action on the sc_cat_item table, and configure it like so:
-
Name: Try in Portal
-
Table: Catalog Item [sc_cat_item]
-
Order: 100
-
Action name: try_in_portal
-
Show update: true
-
Client: true
-
Form button: true
-
List context menu: true
-
Onclick: openPortalPageList()
-
Condition: gs.hasRole(‘sp_admin’)
- You can change the required role here if you like
Once that’s all set up, here’s the code:
function openPortalPageList() {
    var itemID = g_form.getUniqueValue();

    var gwPortals = new GlideDialogWindow('try_item_portal_page');
    gwPortals.setTitle('Try Portal Page (select portal)');
    gwPortals.setPreference('portal_page_id', 'sc_cat_item');
    gwPortals.setPreference('item_id', itemID);
    gwPortals.render();
}
Now we just have to create the UI Page that this UI Action is referencing: try_item_portal_page. To do that, navigate to the UI Page [sys_ui_page] table, and click New to create a new record. Set the Name field to try_item_portal_page.
Enter the following code in the HTML field:
<j:set var="jvar_page_id" value="${RP.getWindowProperties().get('portal_page_id')}"/>
<j:set var="jvar_item_id" value="${RP.getWindowProperties().get('item_id')}"/>
<g:evaluate var="jvar_gr" object="true" jelly="true">
    // find existing portals
    var grPortal = new GlideRecord("sp_portal");
    grPortal.query();
    grPortal;
</g:evaluate>

<j:while test="${grPortal.next()}">
    <div style="padding:4px;" onclick="goThere('${grPortal.url_suffix}', '${jvar_page_id}', '${jvar_item_id}')">${grPortal.title} (/${grPortal.url_suffix})</div>
</j:while>
Finally, enter the following code into the Client script field:
function goThere(suffix, id, item) {
    var url = new GlideURL('/' + suffix);
    url.addParam('id', id);
    url.addParam('sys_id', item);
    var w = getTopWindow();
    GlideDialogWindow.get().destroy();
    w.popupOpenFocus(url.getURL(), 'try_portal_page', 950, 700, '', false, false);
}
That’s it! Now you’ve got a functioning “Try in portal” UI Action on your Catalog Items!
Comments