ServiceNow: What's New in Geneva & UI16 (Pt. 2)
Note: This is part 2 of a 2-part series of posts on ServiceNow’s Geneva version, and the updated UI16 that comes along with it. Please read Part 1 first, or you might lack context for some of the things we discuss.*
In this follow-up article, we’re going to talk about some of the updates that were made to the “Part 1” article shortly after publishing it, list out some of the more technical changes in Geneva, as well as answer some of the most common questions that our clients and reads have had for us.
First, let’s jump straight to the Q&A section, which includes new info on how to more fully customize the UI16 interface and work around some of the new features to restore original functionality or customize the new functionality.
**Q: I think that the functionality on the Incident form that combines the Work Notes and Additional Comments fields into one is interesting, but I don’t want to have to re-train my service desk agents, or risk any confusion.
How can I make the “Work Notes” and “Additional Comments” fields in UI16 default back to the original UI15 behavior, where they appear as separate fields?**
A: This is a question that I’ve heard from multiple sources, and yes, there is an easy answer (though it isn’t documented anywhere that I’ve found).
 ServiceNow Incident Form Fields Geneva UI16
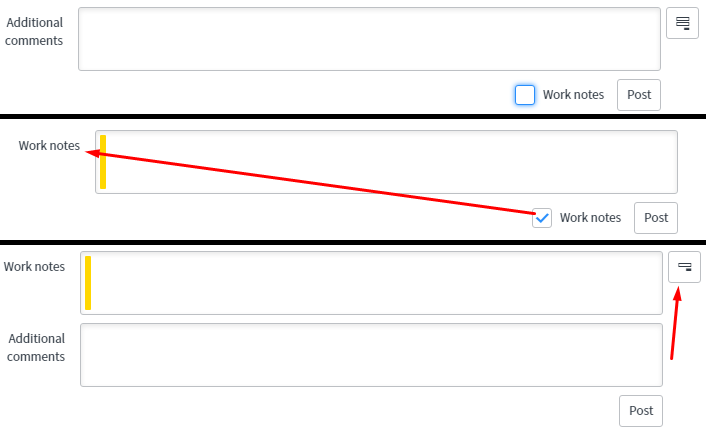
As a quick refresher on the functionality that we’re talking about here - in UI16, the Incident form’s Work Notes and Additional Comments (customer visible) fields appear not as two separate fields as they have in the past, but instead appear as a single field.
ServiceNow Incident Form Fields Geneva UI16
As a quick refresher on the functionality that we’re talking about here - in UI16, the Incident form’s Work Notes and Additional Comments (customer visible) fields appear not as two separate fields as they have in the past, but instead appear as a single field.
If you tick the Work Notes checkbox below the field, write a comment in the field, and save the form, then you’ve just written to the Work Notes journal.
However, if you leave that box un-ticked when you save the record, you’re writing your comments to the Additional Comments journal.
Users of the application can easily re-enable the old view manually, where the fields appear as two separate inputs by clicking the little stack icon on the right as you can see in the third segment of the screenshot to the right. In fact by doing so, the system will remember their preference, and will continue to show them the two separate fields after they’ve made the selection once.
Whenever that happens, it’s likely that the system has created a user preference record, which leads me into the solution…
Unfortunately, there is no system property that directly controls the behavior of these fields - but if we really want the fields to show up as two separate fields by default for all new users (and any user who hasn’t already manually selected a preference by clicking the stack icon), this is easily accomplished by setting a system-wide global user preference. Here’s how:
 Click to enlarge - glide.ui.activity_stream.multiple_inputs
 Creating global user preference to show multiple activity input fields
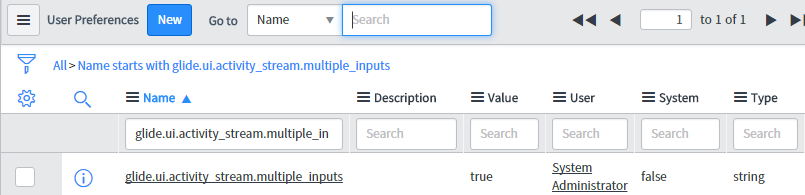
- Navigate to the User Preferences table by entering sys_user_preference.list into the application navigator filter bar in Geneva UI16, and pressing Enter.
- Filter the list by Name, Is, glide.ui.activity_stream.multiple_inputs
- Any users that have manually set their preference by clicking the stack icon will have entries here, indicating their preference. If you would like to clear all user preferences, you can simply delete all of the records here. We’ll create a global default preference next.
- Click New to create a new record.
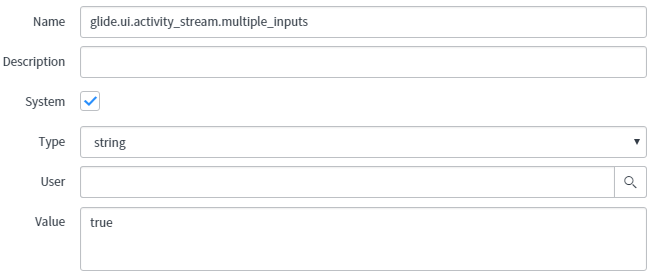
- Set Name to glide.ui.activity_stream.multiple_inputs.
Set the System tick-box to true (ticked).
Set the Type to string.
Leave the User field blank.
Set the Value to true.
Click Save.
Note: Setting a global default preference in this way does not override any existing or future user preferences. If you really wanted to do that, you could create a business rule to wipe out a particular user preference type or prevent it from being created using a data policy or something.
Using the steps above, you are creating a System-wide default user preference. This is the result of ticking the System box, and leaving the User field blank.
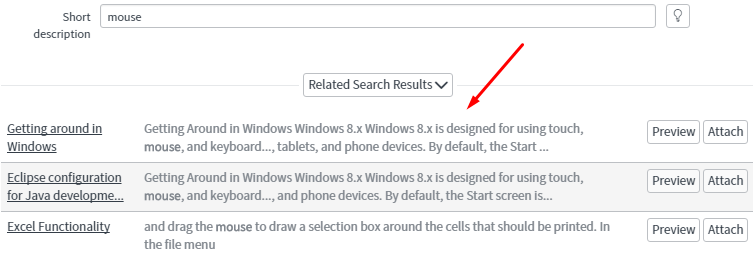
**Q: On the new Incident, problem, or catalog task form, when you type into the short description box, search results from the knowledgebase and service catalog appear below. Clicking “attach” next to a knowledge article (or previewing it, and clicking “Attach to Incident”) causes the knowledge article HTML code to be pasted into the “additional comments” field on the form.
Is there a way that I can change this behavior so that the KB details are pasted into another field, or into a field on a different/sub task?**
A: Absolutely. In fact, you can directly control whether and where the knowledge content is pasted using just a system property. But first, let’s figure out how this stuff works (you know, because I’m a huge nerd and I enjoy digging into arcane stuff like this):
If you’re on an incident/problem/catalog task, etc. - and you’ve entered some value into the short description, and then you’ve clicked on “Preview” on the knowledge article, you’re going to see a little UI popup inside your browser window.
The behavior that you want to change, it sounds like, is what happens when you click on “Attach to Incident”, so let’s see if we can figure out how that button works.
That button is generated by a UI Macro called kb_view_attach_button, which looks like this:
<?xml version="1.0" encoding="utf-8" ?>
<j:jelly trim="true" xmlns:j="jelly:core" xmlns:g="glide">
   <g:macro kb_search_table="" />
   <g:evaluate var="jvar_search_fields" expression="gs.getProperty('glide.knowman.attach.fields');" />
   <g:evaluate var="jvar_attach_button_msg">
      var label = GlideMetaData.getTableLabel("${jvar_kb_search_table}");
      if (label != null ${AND} label != "")
         gs.getMessage("Attach to") + " " + label;
      else
         gs.getMessage("Attach to record");
   </g:evaluate>
   <button name="not_important" value="sysverb_attach" class="header" style="white-space:nowrap;"
      onClick="return attachIncident2(this, '${jvar_search_fields}');">${jvar_attach_button_msg}</button>
</j:jelly>
This UI Macro has three interesting pieces of information in it:
- The jvar_search_fields var is generated by server-side evaluating the property: glide.knowman.attach.fields.
- The button’s value is sysverb_attach, which in this case means that it’s passing that action-value to the SearchService (which unfortunately, is a protected object in ServiceNow.
- On click, the button runs and returns the result of the attachIncident2 function, passing in this (the form context itself), and the variable jvar_search_fields (which we learned above, was generated by a server-side property).
Pro Tip*: Usually, any action beginning with sysverb is meant to trigger a button or element on the form, with that name. For example, I could use gsftSubmit(gel(‘sysverb_update’)) to trigger a submit using the “update” element on the form. The element to must be rendered on the form to be triggered in this manner, however. Sysverbs are usually defined as action names in UI Actions.*
Let’s dig deeper!
As we learned above, we’re using a system property to determine which field(s) are populated when a knowledge article is attached to an incident, problem, or catalog task. This system property (glide.knowman.attach.fields)‘s value will determine which field(s) are populated. Happily, you can even dot-walk in the value field; for example, I might enter parent.comments here, to have the knowledge article pasted into the comments field of the record stored in the parent field on the current record.
Note: Helpfully, the value copied into the field is dependant upon the type of field selected in the property mentioned above! If you select a reference field (to the kb_knowledge table), the value entered into the field will be a sys_id, creating a link to the KB article. Otherwise, it’ll paste in the contents of the KB article.
That’s pretty cool! But if you want to know (or change) how it actually does all that neat stuff, you’ll need to go a little deeper - As we mentioned in #3 above, the UI Macro responsible for the Attach button calls out to a function called attachIncident2. This function is one of many, in a UI Script (which is a lot like a client-side script include) called KnowledgeFunctions. That function looks like this:
function attachIncident2(x, target) {
    if (self.opener) {
        var lastSaved = self.opener.document.getElementById("onLoad_sys_updated_on").value;
            if (!lastSaved){
                self.close();
                var err = (gel('error_msg')!=null)?gel('error_msg').value:"Invalid action: Record needs to be saved first";
                self.opener.g_form.addErrorMessage(err);
                return false;
            }
        var e = self.opener.document.getElementById("sys_uniqueValue")
        var task = e.value;
    }
    var f = x.form;
    var sysID = f.sys_id.value;
   if (typeof sysID == "undefined") {
      sysID = f.sys_id[0].value;
   }
    var args = new Array();
    args.push(sysID);
    args.push(target);

    var ajax = new GlideAjax("KnowledgeAjax");
    ajax.addParam("sysparm_type","kbAttachArticle");
    ajax.addParam("sysparm_value",sysID + "," + task);
    ajax.getXML(kbReturnAttach2, "", args);

    return false;
}
This script does a whole bunch of checking and validating and so on, but the real meat of it is down around the last 13 lines (starting with var args = new Array()).
Starting with this line, the function declares an array, and pushes two values to it: The sys_id of the record you’re on when you click the “Attach to Incident” button, and the “target” field (the one that we got/set in the glide.knowman.attach.fields property).
Next, the function declares a new GlideAjax object and passes in KnowledgeAjax to the constructor. If you read my article “GlideRecord & GlideAjax: Client-Side Vs. Server-Side”, you’ll know that this defines the client-callable script include that will eventually be passed these parameters and return a value to the callback function specified in the .getXML() method. I won’t go over how GlideAjax works here, since I covered it in detail in that article. If you haven’t seen it, I strongly recommend checking it out in order to learn more about GlideAjax.
Pro Tip: This script has a great example of cleverly appending arguments to what will be the callback function call, by passing an array of additional arguments into the .getXML GlideAjax method as the third argument. If you use GlideAjax as often as you really ought to, you can bet that this functionality will come in handy!
The last important bit in this function is the line where we call .getXML and pass in a function called kbReturnAttach2 as an argument - this is our callback function, which can also be found in the KnowledgeFunctions UI script, a few lines down. That function looks like this:
function kbReturnAttach2(AJAXResponse, args) {
    var fieldName = self.opener.fillField;
    var tableName = fieldName.split('.')[0];
    var sourceID = args[0];
    var targetFields = args[1];

    var items = AJAXResponse.responseXML.getElementsByTagName("item");
    if (items.length > 0) {
        var item = items[0];
        var name = item.getAttribute("name");
        var value = item.getAttribute("value");
    }

    if (!(self.opener)) {
        self.close();
        return;
    }

    var names = new Array();
    if (targetFields) {
        var parts = targetFields.split(",");
        for (var i = 0; i < parts.length; i++)
            names.push(parts[i]);
    }
    names.push('comments');
    names.push('description');
    var target = null;
    var targetName = null;
    for (var i =0; i<names.length; i++) {
        targetName = names[i];
        target = self.opener.document.getElementById(tableName + "." + targetName);
        if (target)
            break;
    }

    if (target) {
        var ed = self.opener.g_form.getGlideUIElement(targetName);
        if (ed && ed.type == 'reference') {
            self.opener.g_form.setValue(targetName, sourceID);
        } else {
            var newValue = "";
            if (target.value == "")
                newValue = value;
            else
                newValue = target.value + "\n" + value;
            self.opener.g_form.setValue(targetName, newValue);
        }
    }

    self.close();
}
This is the script that you can customize to suit your specific use cases - and I’ll end the rabbit hole there. Now that you can see all the moving parts that make this functionality work, hopefully you can customize it to your heart’s content. Do you have a specific situation in mind, and need some help making it happen? Click Contact Us at the top of this page, and book some time to discuss your question! It’s totally free! (I mean, within reason.)
Q: Is there any way to control or modify the actual block of KB/service catalog search results that show below the Short Description field after filling it out, in an Incident, Problem, or Catalog Task?
 Related Search Results Field on Incident Form in Geneva UI16
A: Yes, sort of. This block is controlled by the Contextual Search Results UI Formatter (UI Formatters can be found in the sys_ui_formatter table).
Related Search Results Field on Incident Form in Geneva UI16
A: Yes, sort of. This block is controlled by the Contextual Search Results UI Formatter (UI Formatters can be found in the sys_ui_formatter table).
The UI Macro (in the sys_ui_macro table) which controls this, is called cxs_table_search.
This UI Macro calls an embedded J template called searchservice_table, which (as is standard for j templates), you unfortunately cannot modify.
J Templates are kinda like the “compiled” versions of UI Macros and UI Pages (and a few other things) that you have no access to. Think of them as part of the compiled, no access, codebase of the ServiceNow platform.
Pro Tip: If there is an OOB script or record with a protection policy on it that prevents you from editing it, you can submit an incident to ServiceNow, and they have a process in place to determine if they can allow it. If granted permission by development, they can un-protect the record, and allow you to customize it!
Fortunately however, you can make a great deal of modifications through the Contextual Search application from the Application Navigator. That is where I recommend making your customizations.
Q: We use the **Attached Knowledge ‘field’ (in the Related Records tab) to quickly identify incident type and context. However, sometimes the wrong article or attached, or the nature of the incident ends up being different than it initially appeared.
Is there any way to** remove an article from the Attached Knowledge field in Related Records, on an Incident/Problem/Catalog Task?
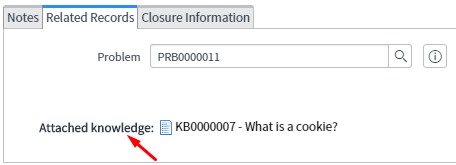 Attached Knowledge Related Record Field on Incident or Problem Form
A: Yes! In fact, it’s quite easy to do, once you realize that that field isn’t the same type of field that, say, “state” is, or even the “problem” field in the Related Records table. The Attached Knowledge field is some kind of weird UI field that you can’t modify the contents of, because it’s really more like a formatter for the m2m_kb_task Many-To-Many table.
Attached Knowledge Related Record Field on Incident or Problem Form
A: Yes! In fact, it’s quite easy to do, once you realize that that field isn’t the same type of field that, say, “state” is, or even the “problem” field in the Related Records table. The Attached Knowledge field is some kind of weird UI field that you can’t modify the contents of, because it’s really more like a formatter for the m2m_kb_task Many-To-Many table.
This table (m2m_kb_task) holds linkages between KB articles, and task records; you can see its’ contents by adding the Attached Knowledge related list to your form, at which point you’ll notice that the records in that related list are the same as the records shown in the Attached Knowledge field! To modify the contents of the field, simply click Edit on the related list, and add/remove KB articles from that interface.
What’s Else is New in Geneva & UI16?
Features removed:
- You can no longer right-click modules in the Application Navigator to edit them.
- Split Pane browsing is no longer possible in UI16 (but can be re-enabled by using UI15 in Geneva).
New features and changes:
- Activity Stream
- Attachments now appear in the Activity Stream on both forms and lists.
- User Avatars now display next to activities, indicating who caused it.
- Activity streams associated with multiple journal fields no longer show all of them at once. Click the Show All Journal Fields icon to display all at once.
- On Lists, you can add comments directly from the activity stream.
- There is a new property, glide.history.max_entries, which controls the maximum number of entries to display in the activity stream on the form.
- Tabbed forms are enabled by default for new instances; upgraded instances retain their original settings.
- A new System Properties application module has been added: Basic Configuration UI16. This module contains properties relating to customizing the UI of the UI16 interface, including the following:
- Page header caption
- Browser tab title
- UI16 banner image
- And many color-related settings
- Web Services
- Scripted REST Apis allow customers to build a custom API with support for security, versioning, and API explorer integration.
- The new Attachment Rest API allows web services integrations to more easily interact with attachments on ServiceNow.
- You can now substitute variables in outbound REST messages automatically using the Auto-generate variables related link on the HTTP Method form.
- Outbound REST messages now support OAuth 2.0
- You can now create ACLs with type REST_endpoint, which only apply to scripted REST APIs.
- Simplified Workflows, so non-developers can build simple workflows easily.
- Deletion of a table now carries over via update sets
- The Version Compare tool that loads when you click the Compare to Current UI Action on most record types is now a much more helpful Merging tool.
 ServiceNow new merging compare tool
- Surveys
- Users can now answer a question using a reference field
- Users can now attach files to a survey
- The task_assessment_detail view now shows the survey responses for a given task.
- You can now use Proposed Changes Verification to create a script that will be used to validate a proposed change and ensure that invalid data doesn’t get into the CMDB.
Comments