Customize the Reference Icon Pop-up
As most ServiceNow users know, when you hover over the icon next to a reference field on a given form, you can see some details about the record that’s being referenced.
![]() ServiceNow reference icon popup view
Well, what if you want to customize which fields are shown in that pop-up reference view?
ServiceNow reference icon popup view
Well, what if you want to customize which fields are shown in that pop-up reference view?
When a requirement came through to do just that in my instance, I was stumped for a good long while, chasing down some inaccurate/outdated documentation, but eventually I figured out the following process.
Step 1: Navigate to the table that the reference field points to, and open the form view for any record there.
You’re going to need to add a view to the table that’s being referenced by the reference field. In the screenshot example above, we used a User record, so we’ll navigate to the sys_user table.
Step 2: Right-click on the list header, and choose Configure->Form Layout.
This will take you to a page with a couple of field lists, but what we’re interested in, is the “Form view and section” area. In that area, select the View name drop-down list.
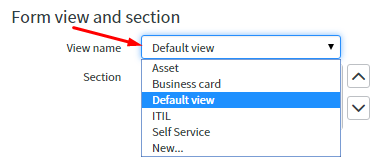 Form view and section
In this list, look for sys_popup. If you see it in that list, you can move on to step 3. Otherwise, you’ll need to create it. (Most instances will not have this view, as it isn’t created out of the box.)
Form view and section
In this list, look for sys_popup. If you see it in that list, you can move on to step 3. Otherwise, you’ll need to create it. (Most instances will not have this view, as it isn’t created out of the box.)
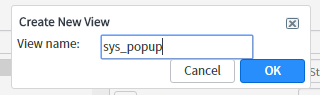
To create the sys_popup view, select New… from the bottom of the view list. When prompted, give the view the name: sys_popup.
Click OK, then return to the form for the table we’re referencing (the User form in our case).
Pro tip: Remember that you can quickly access the form for a given table by entering table_name.form in the filter text box at the top of the Application Navigator. In our case, that would be sys_user.form. To open the form in a new tab/window, type FORM in all caps; and if you’re on Geneva/UI16, you’ll need to press Enter.
Step 3: Back on the form in question (sys_user.form in our case), right-click the header bar, and select Configure->Form Design.
On the Form Design page, select the sys_popup view, and configure it to suit your business need.
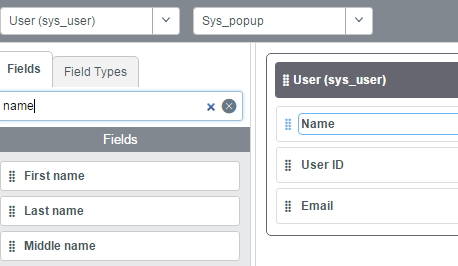 User form design for sys_popup view
Step 4: Save the new design for the sys_popup view by pressing the big blue Save button at the top-right, then return to a form that references the table you just customized. Hover over the reference icon, and you should see the newly customized view!
User form design for sys_popup view
Step 4: Save the new design for the sys_popup view by pressing the big blue Save button at the top-right, then return to a form that references the table you just customized. Hover over the reference icon, and you should see the newly customized view!
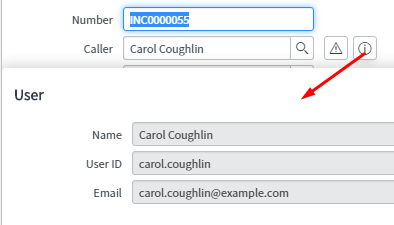 sys_popup user view
And that’s all there is to it! Have fun customizing your sys_popup views!
sys_popup user view
And that’s all there is to it! Have fun customizing your sys_popup views!
Comments