A Better, One-Click Approval
The way approvals work in ServiceNow by default is that an email goes out, and the user can click a link in the email to approve or reject. That link is generated in the default approval notification template using ${mailto:mailto.approval}. Clicking the link that is generated in the approval email based on this template, will pop up another email on the user’s computer.
However, this only works if they have their system configured to correctly handle mailto href links, and if they received the email using the same program they’ve configured to handle mailto links, and if they’re not using webmail.
Definitely not ideal.
How can we improve this situation? As is the case with nearly every problem in life, the answer is CODE!
Our goal will be to give users a link that they can click to approve or reject a record, that doesn’t use mailto, and that works no matter how they’re viewing or sending email.
We’re going to accomplish this by custom-crafting the URL that’s sent to the user to include a special sysparm value, which we will use in a client script on the sysapproval_approver table.
Tip: Skip to the end of this article if you just want to skip all the techno-jive and deploy this in your instance!
Just to get you across some of the terminology here: ServiceNow notifications reside in the sysevent_email_action table, and can be triggered based off of a change to a record, or an event firing. They can either be written on an individual basis by filling out the record in the email notification table, or a template can be applied on the record by a reference field, which points to the templates table (sys_template).
Let’s start with the mail script that we’ll call to get our special links.
First, navigate to the sys_script_email table by entering sys_script_email.list in your application navigator’s filter text bar (and pressing Enter if you’re on Geneva/UI16). On that table, click New.
Give your script a name (I used one_click_approval_links), and then enter the following script into the Script box:
var baseLink = gs.getProperty('glide.servlet.uri') + 'nav_to.do?uri=' +
    current.getTableName() + '.do?sys_id=' + current.getValue('sys_id') +
    '%26sysparm_input=';
var approvalLink = baseLink + 'approved';
var rejectLink = baseLink + 'rejected';
var answer = '<a href="' + approvalLink + '">Click here to approve</a> || ' +
    '<a href="' + rejectLink + '">Click here to reject</a>';
template.print(answer);
Pro tip: Even though the Mail Script record isn’t directly referencing anything right now, it will be called from the context (think: scope) of a notification record. Therefore, we can use the current object within a mail script, and have it refer to the same record as ‘current’ in the notification does, which is whatever record was updated or otherwise triggered the notification in the first place!
On line 1, we construct the base link, which will have everything except the sysparm_input value (approved/rejected). We then use baseLink to construct approvalLink and rejectLink on lines 2 and 3 by appending “approved” or “rejected” to the end of the base link.
We then use THOSE values to build answer on line 4, which is what we print to the template on line 5. It is a line of HTML that makes two links that look like this:
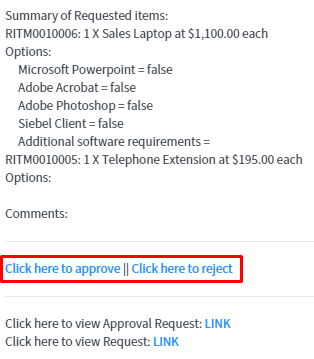 One-click approval links in SNow notification email
The Approve and reject will be linked to the relevant sysapproval_approver record, along with the sysparm_input value to trigger our client script.
One-click approval links in SNow notification email
The Approve and reject will be linked to the relevant sysapproval_approver record, along with the sysparm_input value to trigger our client script.
Now that we’ve written the mail script, we need to include it in our template.
On your instance, navigate to the sysevent_email_action table, and filter the table so it only shows notifications on the sysapproval_approver table that are active.
 sysevent_email_action table filter to show approval notifications
With this filter enabled, you should see all the active notifications triggered from the approvals table. You’ll also notice a couple of templates. The main ones we’re interested in, are request.itil.approve.role, and change.itil.approve.role.
sysevent_email_action table filter to show approval notifications
With this filter enabled, you should see all the active notifications triggered from the approvals table. You’ll also notice a couple of templates. The main ones we’re interested in, are request.itil.approve.role, and change.itil.approve.role.

Note: I’m going to open up the request.itil.approve.role template, but the following can easily be adapted for any template, or any notification without a template.
First, let’s identify and remove any other approve/reject links in the template or notification. In my case, I’m working with the request.itil.approve.role template, which has the two mailto links that I’ll remove.
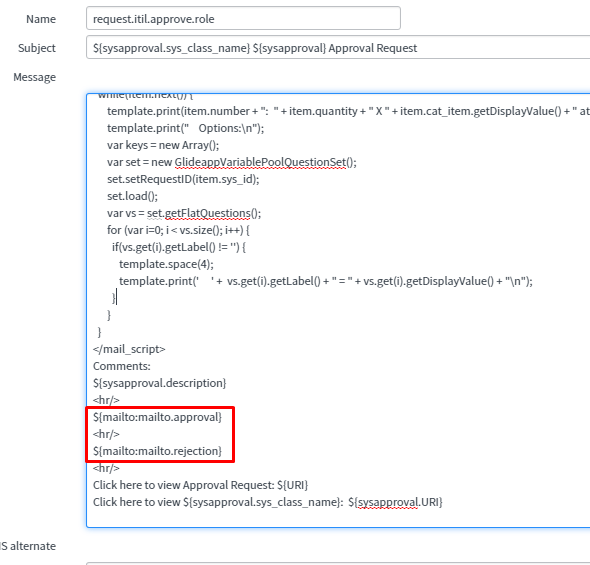
I will replace these two mailto link scripts with my mail script, with ${mail_script:one_click_approval_links}.
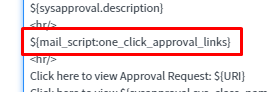
Pro Tip: ServiceNow doesn’t seem to have any documentation on this, but you can run a stored mail script in a notification or template by using ${mail_script:your_mail_script}. This is different from how you’d use an embedded mail script, which would be by writing your code between <mail_script> and </mail_script> tags.
Great! Now that we’ve got the mail script written to generate these links, and the templates updated to use the mail script, let’s add the client script that will make use of the parameter we’ve added.
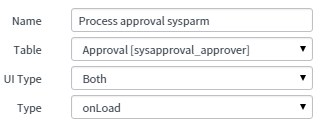
Start by navigating to System Definition -> Client Scripts, and clicking New to create a new one. Give it a name, and select Approval [sysapproval_approver] for the Table. For the UI type, you can select Both. (This way, people can use the link from their mobile devices as well!) For Type, select onLoad.
Finally, copy and paste this script into the Script box:
function onLoad() {
var areYouSure;
var appInput = getParameter('sysparm_input');
if (appInput) {
if (appInput.toUpperCase() == 'APPROVED') {
if (checkApprover()) {
if (g_form.getValue('state') == 'approved') {
alert(g_form.getDisplayValue('sysapproval') +
' has already been approved.');
return;
}
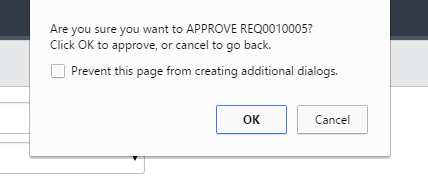
areYouSure = confirm('Are you sure you want to APPROVE ' +
g_form.getDisplayValue('sysapproval') +
'?\nClick OK to approve, or cancel to go back.');
if (areYouSure) {
g_form.setValue('comments',
"Updated by clicking 'Approve' link in approval email.");
g_form.setValue('state', 'approved');
g_form.save();
}
}
} else if (appInput.toUpperCase() == 'REJECTED') {
if (checkApprover()) {
if (g_form.getValue('state') == 'rejected') {
alert(g_form.getDisplayValue('sysapproval') +
' has already been rejected.');
return;
}
areYouSure = confirm('Are you sure you want to REJECT ' +
g_form.getDisplayValue('sysapproval') +
'?\nClick OK to reject, or cancel to go back.');
if (areYouSure) {
g_form.setValue('comments',
"Updated by clicking 'Reject' link in approval email.");
g_form.setValue('state', 'rejected');
g_form.save();
}
} else {
return;
}
} else {
return;
}
} else {
return;
}
}
function getParameter(parm) {
var entireUrl = document.URL.parseQuery();
if (entireUrl[parm]) {
return decodeURI(entireUrl[parm]);
} else {
return false;
}
}
function checkApprover() {
var currentUserID = g_user.userID;
var approver = g_form.getValue('approver');
if (currentUserID == approver) {
return true;
} else {
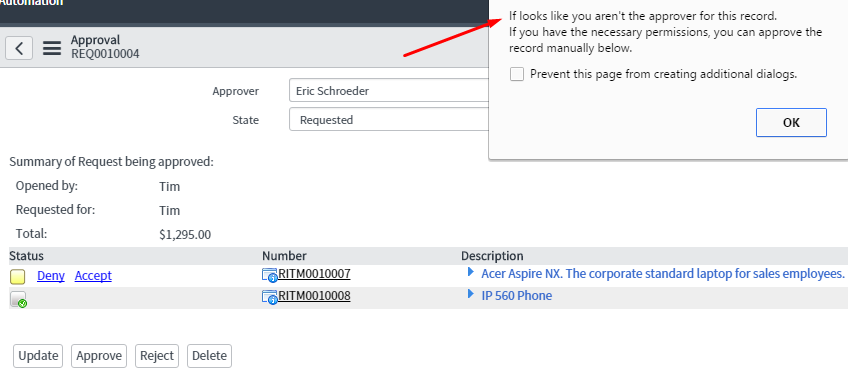
alert("It looks like you aren't the approver for this record. " +
"\nIf you have the necessary permissions, you can approve " +
"the record manually below.");
return false;
}
}Wow, there’s a lot going on there. Let’s break it down.
First, on line 4, we call the getParameter function (declared on line 55). This function gets the current URL, then searches for the parameter we’re looking for (in this case, sysparm_input). If we find it, we return its’ value (which would be “approved” or “rejected”). If we don’t find it, we return false.
On line 6, we check if getParameter returned a “truthy” value. If not (such as if the getParameter function mentioned above returns false because our parameter doesn’t exist) then we quickly return, halting execution of the rest of our client script. This is done early on in order to limit the amount of client-side code that needs to execute when an approval record is viewed, if it is viewed in any way other than by clicking our specially crafted approve/reject links.
Pro tip: In Javascript, any string is “truthy” in that if it’s abstractly (as opposed to strictly) compared in an if() block, it will behave as though it returns true. You can read more about truthiness at the link above, and about falsiness here.
We then have two conditions that could be met defined on lines 8 and 27. These check whether the sysparm_input value is approved, or rejected. In either case, then the script will check if the user is the authorized approver for this record.
If the user is the authorized approver, then we prompt the user to confirm their choice, and either set the approval record to ‘approved’ or ‘rejected’ based on which link the user clicked.
Don’t feel like doing all that work? No problem, you lazy jerk - I’ve done it for you! Just download the Update Set XML below, and import it into your instance! Here’s how:
-
Download the app from the application page.
-
Elevate privileges to the security_admin role.
-
Navigate to System Update Sets -> Retrieved Update Sets.
-
Click the Import Update Set from XML link.
-
Click Choose File and select the XML file you downloaded, then click Upload.
-
Commit the update set.
-
Open the update set you just uploaded
-
Click Commit Update Set.
-
That’s all there is to it!
Thanks for reading, don’t forget to subscribe, and happy developing!
Comments