Make Your Log Entries Easier to Find
Like most developers, I write a lot of code.
Like all developers, sometimes my code doesn’t work.
When that happens (server-side), I rely on gs.log() to spit out some information to tell me when, where, and maybe even how the error happened.
gs.log() is an extremely useful little function that is great for troubleshooting your code in dev, as well as catching unexpected behavior or circumstances in production.
For example, you might have your code run inside a try { } block, but have the catch() { } log the error message and accompanying run-time technical details using gs.log().
Or, you might write your code so that if a function receives some unexpected data, a log entry is created with the details, while the user is informed using gs.addErrorMessage().
The problem is that whenever I make one of these logs, I find myself sifting through tens, hundreds, or even thousands of other log entries to find just the one that my code triggered - and of those, just the one that was triggered by the most recent execution of my code, that might give me insight into the issue.
What’s even worse, is if a user has to let me know about a bug or error they got, but they can only tell me that it happened “around Thursday”. How am I supposed to find that log!?
In order to help me out, I’ve written a simple little script include that will allow you to log a message, warning, or error to the system logs, AND return a link to the system log table with a query showing all log activity for a few seconds on either side of my script executing, which gives me a quick way to find my error message, as well as get the context of whatever else might be executing simultaneously (for those heisenbugs that only seem to happen intermittently).
It also allows me to construct error messages for users that contain the log-link which they can send to me!
Here’s how it’s done:
First, create a new Script Include by navigating to System Definition -> Script Includes, and clicking New.
Next, give your new Script Include the name logWithLink. (You can change this name, but you must also change the name of the function in the script below, to match.)
Enter a nice description, and then copy the code from below:
function logWithLink(msg, type) {
    if (!msg) {
        try {
            logWithLink('Script include logWithLink called without a message argument.', 'warning');
        } catch(e) {
            gs.log('Script include logWithLink has failed with the following error: ' + e.msg);
        }
    }
    var gdt = new GlideDateTime(gs.nowDateTime());
    gdt.add(5000);
    var nearFuture = gdt.getValue();
    gdt.subtract(30000);
    var halfMinAgo = gdt.getValue();
    var query = 'sys_created_onBETWEENjavascript:gs.dateGenerate(\\'' +
        halfMinAgo + '\\')@javascript:gs.dateGenerate(\\'' + nearFuture + '\\')';
    var logLink = gs.getProperty('glide.servlet.uri') +
        'syslog_list.do?sysparm_query=' + query;
    if (type.toLowerCase() == 'error' || type.toLowerCase() == 'err') {
        gs.logError(msg, 'logWithLink');
    } else if (type.toLowerCase() == 'warning' || type.toLowerCase() == 'warn') {
        gs.logWarning(msg, 'logWithLink');
    } else {
        gs.log(msg, 'logWithLink');
    }
    return logLink;
}
First I’ll explain how this works, and then I’ll tell you how to use it.
On line 1, we declare our function name. As I mentioned above, it is important that this function name exactly match the name of the script include.
On lines 2-9, we do a quick check to determine whether the user passed in at least one argument. If not, we recursively call the logWtihLink function, to log an error. If that call fails, we log the error that caused the error logging to fail. heh heh.
Next, Line 10, we declare a new GlideDateTime object, and set it to whatever time it is when the script runs using gs.nowDateTime().
On lines 11 and 12, we add 5,000 milliseconds (5 seconds) and set a variable called nearFuture to the new value. nearFuture is now set to 5 seconds in the future.
We do the same thing but in reverse on lines 13 and 14; we subtract 35 seconds and set it to halfMinAgo.
Using the two variables we just declared (set to 5 seconds in the future, and 30 seconds in the past respectively), we construct a query like this:
var query = 'sys_created_onBETWEENjavascript:gs.dateGenerate(\\'' +
    halfMinAgo + '\\')@javascript:gs.dateGenerate(\\'' + nearFuture + '\\')';
This query says to ServiceNow: “I want all the records where sys_created_on is between <30 seconds ago> and <5 seconds from now>”.
Using the query we just constructed from those two variables above, we construct a link on line 16.
On lines 17-25, we check if the user specified a type of log to create, and we create that type of log with the message that they’ve input. If there’s no input (or invalid input), we just do a generic informational log.
Finally, after logging the message the user specified, we return the link that we generated.
Here is an example of how you might call this function:
var linkToLog = logWithLink('This text will be stored in the system logs.', 'warning');
gs.addErrorMessage('ERROR: Unknown error. Error log located <a href="' + linkToLog + '">here</a>.');
In case it isn’t immediately obvious in what circumstances something like this might be useful, imagine you’ve got a UI Action script that runs on the Incident table. You think you’ve accounted for all sorts of possibilities, but there are a few error cases that you want to catch and give the user (or yourself, while debugging) an easy way to view the logs relating to that issue.
In fact, let’s have a look at our most recent blog post: Quickly Move Changes Between Update Sets. In that post, we discuss a way to easily move your changes from one update set to another. In the code that does that job, we have the following code block:
try {
    current.setValue('update_set', currentUpdateSetID);
    current.update();
    gs.addInfoMessage('The selected <a href="' + updateLink + '">' +
        type + '</a> has been moved to your currently selected update set: ' +
        updateSetGR.getValue('name') + '.');
} catch(e) {
    gs.log('ERROR while moving customer updates: ' + e);
    gs.addErrorMessage('There was an error. Please review the system logs for more details.');
}
Here, we show the user two messages. An “infomessage” if we are successful, and an “errormessage” if we are not. In both cases (but especially the case of the error), we would benefit greatly from the use of the logWithLink() script include. Look how we could change the catch() block to be more useful for troubleshooting:
catch(e) {
    var logLink = logWithLink('ERROR while moving updates: ' + e, 'error');
    gs.addErrorMessage('ERROR: Unknown error. Error log located <a href="' +
        linkToLog + '">here</a>.');
}
Now, if we wanted to REALLY go all-out, we could even give the customer a link to send an email to a distro list, that contains the link to the system logs!
catch(e) {
    var linkToLog = logWithLink('ERROR while moving updates: ' + e, 'error');
    var emailClickHere = '<a href="mailto:servicenowdevs@yourcompany.com' +
        '?cc=servicenowadmins@yourcompany.com' +
        '&subject=Error%20while%20moving%20updates' +
        '&body=%5Bauto-generated%20email%5D%0AHello%2C%20%0A%0A' +
        'I%20received%20an%20error%20in%20ServiceNow%2C%20and%20clicked%20the%20link%20' +
        'to%20send%20you%20the%20logs.%20The%20logs%20can%20be%20viewed%20here:%0A' +
        linkToLog +
        '%20%0A%0A%5BENTER%20ANY%20ADDITIONAL%20COMMENTS%20BELOW%20THIS%20LINE%5D' +
        '">Click here</a>';
    gs.addErrorMessage('ERROR: Unknown error. ' + emailClickHere +
        ' to send an email to the dev/admin team with the details of this error.');
}
On line 3 above, we use the log link that’s generated from the logWtihLink function, to craft another link that the user can click to send an email straight off to the admin and dev team, with a link to the logs. Now THAT streamlines troubleshooting!
I used a tool to easily generate most of the HTML necessary for the email link.
The email that’s generated would look something like this:
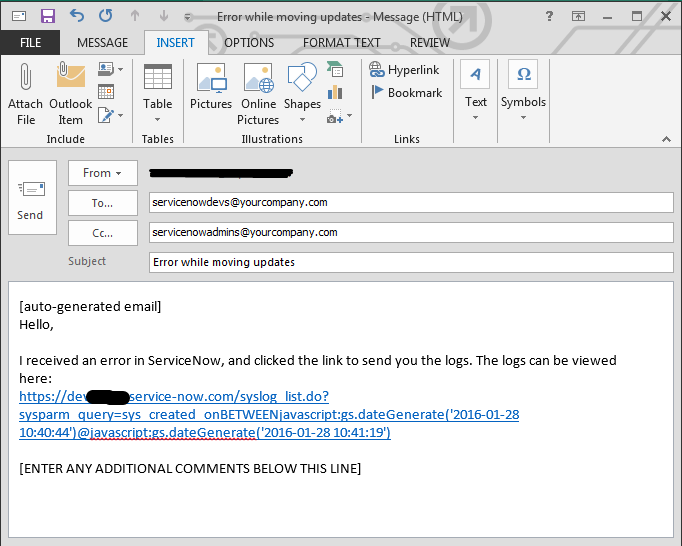 ServiceNow Log Link in Email
Don’t feel like doing all that work? No problem, you lazy jerk - I’ve done it for you! Just download the Update Set XML below, and import it into your instance! Here’s how:
- Download this XML file, and save it to your computer.
- Elevate privileges to the security_admin role.
- Navigate to System Update Sets -> Retrieved Update Sets.
- Click the Import Update Set from XML link.
- Click Choose File and select the XML file you downloaded, then click Upload.
- Commit the update set.
- Open the update set you just uploaded
- Click Commit Update Set.
That’s all there is to it!
Thanks for reading, don’t forget to subscribe, and happy developing!
Comments