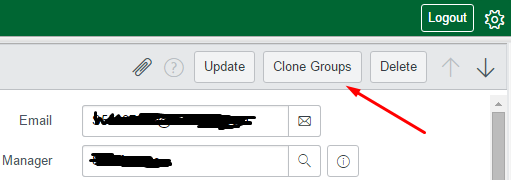
Easily Clone One User's Access to Another User
If you’re a ServiceNow Admin, chances are you get lots of tickets from people asking you to grant or revoke access to this or that.
Sure, onboarding and offboarding, and some basic permissions work, can be automated — but sometimes you just don’t have a catalog item for what the user is requesting, so you have to do it manually.
sigh
So if you’re like me, you get these tickets all the time:
“Jerry doesn’t have access to the same applications as the rest of our team. Please add him to whatever groups he requires to do his job. Nerd.”
Unless you’re intimately familiar with Jerry’s job, you’re going to need some more information to go off of. I normally ask for the ID of another user whose access I can clone, and then open each profile on a separate monitor and go through each group one at a time. I once did 77 groups this way, for two separate users. It was a nightmare…
“There’s got to be a better way!” I can hear you crying from inside an infomercial. Well lucky for you, there is! Since the bane of my existence is manual work, I decided to create a UI Action that will allow me to clone groups (and all accompanying roles) from any one user, to any other.
“But Tim, how did you do that? And how are you so cool!?” you may ask? The answer to both questions is: “CODE!”
Step 1: Create a new UI Page
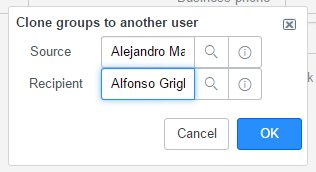
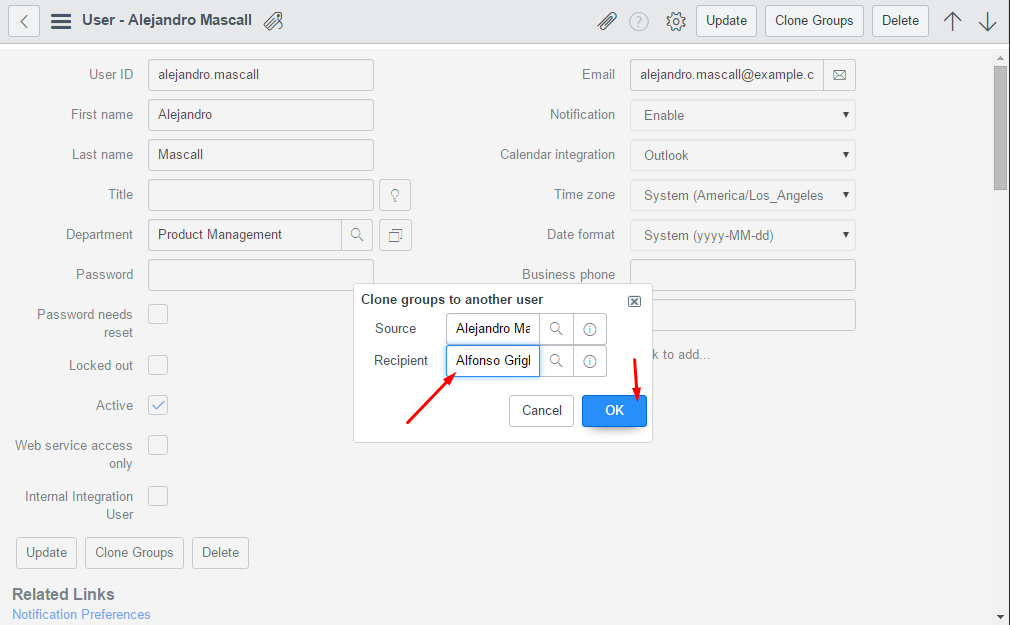
The way this is going to work, is an Admin will visit one user’s form from the sys_user table — we’ll call this user the “Donor” (even though they aren’t losing anything in this process). The Admin will then click the “Clone Groups” UI action, and enter the user who will receive the donor’s groups. Let’s call this user the “Recipient”.
Now, we could do this the easy way and just pop up a dialog on the Donor’s page using JavaScript, get the Admin to paste in the sys_id of of the Recipient, and run the script down below — but that’s not very pretty. Instead of that, let’s create a UI page that contains a reference field for the Donor (auto-populated by our script) and one for the Recipient (which we’ll use to select the Recipient). Then we can make this UI page pop up in a GlideDialogWindow in ServiceNow. Doesn’t that sound fun?
So, to create a UI page, first go to “System UI -> UI Pages”, or just type “sys_ui_page.list” into the type filter text box (do not hit enter). Once there, click “New”.
Start by giving it a name. Let’s use “clone_permissions_popup”. You can then enter a description like “pops up on donor user form when UI action is clicked. Asks to enter recipient user who will be added to all of donor’s groups.”
The code for this page is Jelly, which you might be less familiar with than either HTML (which is also used) or JavaScript:
<g:ui_form>
  <table width="100%">
    <g:evaluate var="jvar_current_user" expression="RP.getWindowProperties().get('current_user')" />
    <tr id="itemrow" >
      <td>
        <div class="form-group form-horizontal">
          <div class="col-md-3 text-right">
            <g:form_label> Source </g:form_label>
          </div>
          <div class="col-md-8">
            <g:ui_reference name="source_ref_field" id="source_ref_field" table="sys_user" value="${jvar_current_user}" />
          </div>
        </div>
      </td>
    </tr>
    <tr id="itemrow" >
      <td>
        <div class="form-group form-horizontal">
          <div class="col-md-3 text-right">
            <g:form_label> Recipient </g:form_label>
          </div>
          <div class="col-md-8">
            <g:ui_reference name="recipient_ref_field" id="recipient_ref_field" query="active=true" table="sys_user" />
          </div>
        </div>
      </td>
    </tr>
    <tr id="poll_img" style="display:none" border="1">
      <td colspan="2" align="center" width="300px">
        <img src="./images/ajax-loader.gifx" alt="${gs.getMessage('Please Wait')}" />
        <p id="poll_text" style="font-weight:bold;"> ${gs.getMessage('Please Wait')} </p>
      </td>
    </tr>
    <tr><td colspan="2"> </td></tr>
    <tr id="dialogbuttons"><td colspan="2" align="right">
      <g:dialog_buttons_ok_cancel ok="return cloneGroups()" />
    </td></tr>
  </table>
</g:ui_form>
As you can see, what we’re doing with this code is creating a UI form, evaluating a “jvar” (javascript variable) so we can use it elsewhere in our form. We’re setting jvar_current_user to the value of the “current_user” variable that we are going to pass into the GlideDialogWindow when we create it, using .setPreference(). You’ll see that down below.
Next, we’re setting up a reference field with the ID “source_ref_field”. This reference field will contain the sys_id of the SOURCE user, which is the current user whose profile we’re on, and whose sys_id we’re going to pass into the dialog with .setPreference — good thing we just evaluated that jvar_current_user variable, huh?
As you can see in line 14, we’re also setting the “value” property of the reference field to the value of the javascript variable jvar_current_user, which is evaluated using ${}.
We do basically the same thing on line 28, but without assigning it a value this time. This field is going to be our Recipient, so we’ll have to fill that in.
Most of the code below that is just setting up the stuff that shows up while the dialog is loading. Not important for our purposes.
After copy-pasting that code into your UI page, we can go ahead and set about creating the UI action that will trigger it, and passing in that variable we discussed, jvar_current_user.
Step 2: Create UI Page Client Script
Client Scripts are (obviously) client-side scripts that run under various circumstances, depending on how they’re configured. UI pages come with their own client scripts that runwhen the UI page is loaded. You could just as well write this code in a
If you look back at the Jelly/HTML we wrote above, you’ll notice around line 44: “ok=“return cloneGroups()"". That is basically going to call the cloneGroups() function from our client script, when the user clicks on OK.
Before we get started though, let’s make a quick outline of what we want this script to do, so we’re “scripting from a script”.
GET IT!? ಥ‿ಥ
- Get a list of all the groups the recipient belongs to
- This user may already have some groups, and duplicates can be a real nuisance. We don’t want to add these groups when we clone.
- Store the sys_ids of each group the user belongs to, to an array.
- Go through every group membership from the donor, that is not in the array of the recipient’s current groups, and add a new grmember record linking the same group to the recipient.
function cloneGroups() {
    var recipientID = gel('recipient_ref_field').value;
    var donorID = gel('source_ref_field').value;
    //get the recipient's groups in an array
    var recipientGroups = getRecipientGroups(recipientID);
    var donorGroup = new GlideRecord('sys_user_grmember');
    var newGroup = new GlideRecord('sys_user_grmember');
    donorGroup.addQuery('user', donorID);
    donorGroup.addQuery('group', 'NOT IN', recipientGroups);
    donorGroup.query();
    while (donorGroup.next()) {
        newGroup.initialize();
        newGroup.user = recipientID;
        newGroup.group = donorGroup.group;
        newGroup.insert();
    }
    alert('Group Clone completed. Click OK to return to the previous page.');
}

function getRecipientGroups(recipient) {
    var recipientGroups = [];
    var recipientGroupRecord = new GlideRecord('sys_user_grmember');
    recipientGroupRecord.addQuery('user', recipient);
    recipientGroupRecord.query();
    while (recipientGroupRecord.next()) {
        recipientGroups.push(recipientGroupRecord.group + '');
    }
    return recipientGroups;
}
Let’s break down the bulk of what this script is doing.
Line 2 gets the recipient’s Sys_ID. The user will have entered this manually, before clicking OK (which is what triggered this function to run).
Line 3 gets the donor’s sys_ID. It does this by grabbing it out of the recipient_ref_field in the UI page, which we set in the Jelly code of the UI page, using a variable that we’ll pass in when we create the UI action.
Pro-Tip: Think of the sys_user_grmember (grmember for short) table as something of a marriage registry, keeping track of what user accounts are “married”/joined to which groups. Fortunately, these marriages are polygamous (many-to-many), so more than one user can belong to a group, and each user can belong to more than one group. This is why the grmember table is necessary to keep track. You can add a user to a group, by adding a record in the sys_user_grmember table, with the ‘user’ field set to that user, and the ‘group’ field set to the group you’d like to add them to.
On line 5, we call a function (lines 21-30) which returns an array containing the sys_id of every group that the recipient belongs to already. It sets this to a variable called recipientGroups. Next, we create two glide records on the grmember table which will help us later on.
We add a query on line 8 which makes it so we only get the grmember records that relate to the donor user. We add another query on line 9 which basically says “don’t return any records in that array of the recipient’s current groups”.
Now that we’ve got the glide record query built, we can iterate through it with “while (donorGroup.next()) {}”. For each loop (which means for every group that the donor is a member of, but the recipient is not) we use the other glide record we declared (line 7) to create a new record in the grmember table. We start with “newGroup.initialize();” which tells the system to prepare for a new entry. We populate that new entry on lines 14 and 15, then save it with .insert() on line 16.
After we’re all done (outside the loop) we go ahead and pop up an alert to let the admin know that we’re done!
You might also notice a “processing script” field below the client script field. This isn’t important, but you can put something like the following in it to control the redirect after the form action is complete.
var urlOnStack = GlideSession.get().getStack().bottom();
response.sendRedirect(urlOnStack);
Step 3: Create the UI Action
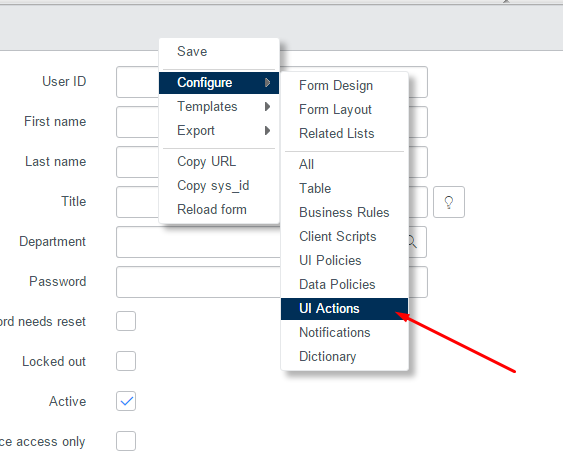
Okay, we’re almost done. The place where we want the UI action to show up is on the sys_user table. Let’s go visit that table now, by typing sys_user.list into the type-filter-text field at the top-left (but don’t hit enter). That’ll take you straight to the user list. Click on any random user in that list, right-click on the header, and go to “Configure->UI Actions”.
Here’s how I configured the UI Action:
Name: Clone Groups
Table: User [sys_user]
Active: X
Show Update: XClient: X
Form button: X
Onclick: cloneGroupsDialog()
Condition: gs.hasRole(‘admin’)

And here’s the script:
function cloneGroupsDialog() {
    //Get the values to pass into the dialog
    var current_user = g_form.getUniqueValue();
    //Initialize and open the Dialog Window
    var dialog = new GlideDialogWindow('clone_permissions_popup');
    dialog.setTitle('Clone groups to another user');
    dialog.setPreference('current_user', current_user);
    dialog.render();
}
It’s pretty simple, just instantiating the GlideDialogWindow object, then setting the title and calling .render to make it show up. The one thing I want to point out is “dialog.setPreference(‘current_user’, current_user);”, which passes in the variable declared in line 3 (the user whose profile is currently selected). This is the value that we referenced in several other places above, containing the donor user’s sys_id.
That’s it! Save and visit a user’s profile page, and you will see a Clone Groups button. Click it, enter a recipient user, and click OK to see the recipient have all of the donor’s groups copied to their profile.
Comments