reCAPTCHA in ServiceNow CMS/Service Portal
Note: We’ve been pretty busy lately, finishing up the final draft of our book: Learning ServiceNow, but we wanted to share something we learned from a recent project, and a free application to automate this for you. Click here to jump to the app download!
CAPTCHA is an acronym (technically, a backronym) for “Completely Automated Public Turing-test to tell Computers and Humans Apart”. Its purpose is to (hopefully) quickly and (ideally) easily differentiate between actual human users, and computerized scripts or bots. The uses for this are vast and varied, but most organizations use them to ensure that the person submitting a given form is a person, not a bot.
There are a multitude of reasons that one might want to verify that the person submitting a form, is indeed a person, and not a robot. Perhaps you’ve got a public-facing CMS or portal page, or perhaps you just want to verify that no nefarious goings-on are scriptable if one of your users’ accounts is compromised.
Whatever the reason, if you need to verify that a form submitter is indeed a person and not a robot (AKA: “CAPTCHA”), read on to find out how, and even get a downloadable update set that you can deploy into your instance to enable this functionality straight away (with a few minor setup-config tweaks).
First of all, we’re going to be using Google’s reCAPTCHA service because it’s arguably the easiest and least frustrating one for users to use, and because it’s extraordinarily effective and doesn’t require that users attempt to figure out what in the world the image spells.
A 1-minute video on Google’s “No-Captcha reCAPTCHA”.
The first step to enabling this functionality, is to set up the reCAPTCHA service for your organization. To get started, head over to https://www.google.com/recaptcha. At the top-right, click on Get reCAPTCHA.
It is at this point that you may want to consider signing up for a company account that can be centrally managed. The last thing you want, is to have your company’s CAPTCHA service tied with your account for all time. Once you’ve carefully considered that situation and have logged in, you’ll be presented with a form like this:
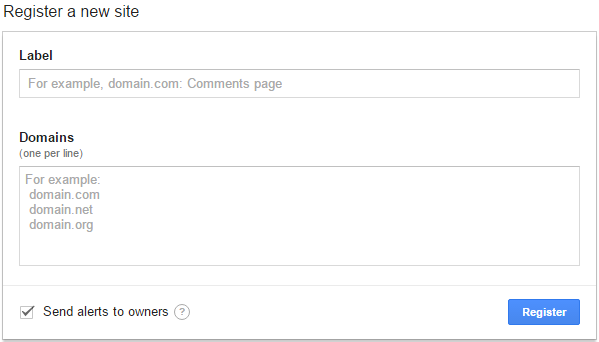
You can re-use a CAPTCHA API on multiple pages, but you may, in the future, want to have more than one CAPTCHA on your CMS/Service portal/whatever, so fill in a good label. I’ll just use something like “[company_name] ServiceNow CMS”. In the Domains section, you could enter your full servicenow instance URI (your_company.service-now.com), but since you’d have to create a separate CAPTCHA for each of your instances (dev, QA, prod, etc), I recommend simply using the domain service-now.com. All sub-domains are automatically included.
Under Advanced Settings on the reCAPTCHA Key Settings form, you can move a slider toward higher security, or greater ease/simplicity of use. On this page, you’ll also find some helpful information from Google: Your Site key, Secret key, a client-side script to include in your page, an HTML snippet, and some info on server-side configuration. Keep this page open for now.
CAPTCHA in a Service Portal Page
Note: We’re only going to go over using reCAPTCHA in a service portal page, since it’s the most complex implementation. However, these instructions can easily be adapted to work with a CMS/UI page, or even a UI macro. The server-side GlideAjax script included in the app at the bottom of this article could be called in virtually the exact same way from anywhere.
If you want to add the reCAPTCHA into a service portal page, you’ll want to create a Widget to start with. This, you can later drop into your page wherever you like. Start by navigating to Service Portal -> Widgets in the application navigator, then click New to create a new widget record. Give the record a name, and an ID (something like reCAPTCHA will do fine for both).
Next, fill in the Body HTML template field. You’ll want to include the script tag and the div from Step 1 on the Google reCAPTCHA page. I’ve also added a Test button and corresponding checkCap function to mine, in order to spit out the response from the CAPTCHA box, if the user attempted to verify their humanity with it, to make sure I’m getting a valid value. I would remove that before using this widget on any other page.
Here’s what mine looks like:
<script src='https://www.google.com/recaptcha/api.js'></script>
<script>
  function checkCap() {
    alert(grecaptcha.getResponse());
  }
</script>

<body>
    <div class="g-recaptcha" data-sitekey="{{data.sitekey}}"></div>
    <input type="button" value="Test" onClick="checkCap()" />
</body>
Notice that I’ve replaced the site key from the code Google provided on the reCAPTCHA page, with {{data.sitekey}}. I’ve done this because I want to be able to set the site key in a system property and retrieve it on load. This way, an admin can change this up on the fly. To set the value of data.sitekey, add the following line into the Server script field, below the comment lines but before the end of the function, then save the widget:
data.sitekey = gs.getProperty('recaptcha.site-key');And then of course, you’ll have to set a system property with the value of your site key (from the reCAPTCHA page) in the sys_properties table. This property should have the name “recaptcha.site-key”.
Let’s create that system property, as well as one called recaptcha.secret-key, with the value from the secret key that you were provided by the reCAPTCHA service, on the same page as the site-key.
To test this widget, navigate to Service Portal -> Pages in the application navigator, then create a new test page. Give it whatever name and ID you like, save the record, then click the Open in Designer Related link. In the Edit view, drag a Container onto the page, and then drag a 12 column box inside the container. In the Filter Widget search box at the top-left of the portal page designer, type “recaptcha” to bring up the widget you just created. Drag the widget into the 12-column box you just created, and then click the pop-out icon at the top-right of the portal page designer to open the page in a new tab. (If you have a popup blocker enabled, make sure you allow the popup.)
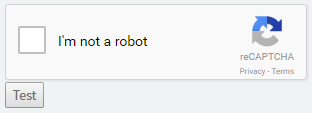
Clicking the Test button will call the checkCap() function in the script in the body HTML template of our reCAPTCHA widget. This function calls the grecaptcha object class that’s exposed from the api.js file that we pointed to, and runs the getResponse() method. This method returns a long alphanumeric string that corresponds to the “CAPTCHA session” of the user on the page. Once the user clicks the I’m not a robot button, this session key is generated. Until then, it’s blank.
Clicking Test when the page first loads will throw an alert with a blank string, since the response generated from getResponse() is blank. However, if you click the I’m not a robot button and THEN click Test, you’ll get an alert with a long and pseudo-random alphanumeric string. This is the “response” string. You can use this in the next step.
Note: You’ll need to view this page by clicking “Try it” on the page record, or going to the URL /sp/?id=YOUR_PAGE_NAME on your instance. While viewing this page within the editor or “preview” mode, the script will not execute properly.
Shortly, we’re going to have to make a few tweaks to our onClick script (including changing it to an “ng-click” script, since the service portal uses AngularJS), but you could write something very similar in an onSubmit catalog client script, or any onClick or onSubmit script for your CMS/UI page/UI macro. The following, is just how we’ll accomplish this in the service portal, using a widget.
What we need to do now, is make it so when we click on the Test button, it checks whether you’ve successfully validated that you’re not a robot. If we were to do this entirely client-side, anyone with any knowledge of scripting could fairly easily override whatever we attempted to do to validate it. As a general rule, anything “client-side” cannot be trusted when it comes to true security or validation, because in the end, the person (or bot) at the keyboard has ultimate control over their own client/browser. Instead, let’s do a server-side lookup.
In the CMS (and most other cases), this can be done with a simple GlideAjax script. More info on GlideAjax here. However, since this is the Service Portal, we’ve got to do things the service portal way, so let’s go back to that reCAPTCHA widget we created earlier, and make a few changes.
First, let’s update the HTML Template to look like this:
<script src='https://www.google.com/recaptcha/api.js'></script>
<body>
    <div class="g-recaptcha" data-sitekey="{{data.sitekey}}"></div>
    <input type="button" value="Test" ng-click="c.checkCap()" />
</body>
Now, the button is linked with an Angular client-side controller script, and the “ng-click” action is called when the button is clicked. In this case, that means calling the “checkCap()” function in the client controller. Here’s what the client controller (AKA “client script”) code looks like:
function() {
    /* widget controller */
    var c = this;
    c.checkCap = function() {
        var resp;
        c.data.captchaSession = grecaptcha.getResponse();
        if (!c.data.captchaSession) {
            alert('Nice try, robot. \nYour mighty microchips are no match for our CAPTCHA technology!');
            resp = false;
        }
        c.server.update().then(function() {
            var captchaResponse = c.data.captchaResponse;
            if (captchaResponse) {
                resp = isThisTrueOrWhat(captchaResponse);
            }
        });
        grecaptcha.reset();
        return resp;
    }
}
function isThisTrueOrWhat(b) {
    return ((typeof b == 'string') ? (b.toLowerCase() == 'true') : (b == true));
}
This angular controller’s scope is the widget, so on line 3: var c = this;, just declares “c” as a shorthand for the widget’s scope. Within that scope, we’ve defined the checkCap function (c.checkCap). This function first calls grecaptcha.getResponse(), which is an API provided by the inclusion of the reCAPTCHA script itself. This retrieves the current “session ID” for the user, and then validates that we were able to get a value from it. If not, we throw an alert: “nice try, robot”.
If we’ve got a valid response though, we call the Angular-ey c.server.update() API, and to provide our callback function, we chain the .then() method, passing in an anonymous inline function. This inline function is called after our server script runs, so let’s have a look at what that script looks like:
(function() {
    data.sitekey = gs.getProperty('recaptcha.site-key');

    if (input) {
        data.captchaResponse = null;
        data.captchaSession = input.captchaSession;
        try {
            var RESTCAPTCHA = new sn_ws.RESTMessageV2();
            RESTCAPTCHA.setHttpMethod('post');
            RESTCAPTCHA.setEndpoint('https://www.google.com/recaptcha/api/siteverify');
            RESTCAPTCHA.setQueryParameter('secret', gs.getProperty('recaptcha.secret-key'));
            RESTCAPTCHA.setQueryParameter('response', data.captchaSession);
            var captchaResponse = RESTCAPTCHA.execute();
            if (captchaResponse.haveError()) {
                gs.logError('Error in validating captcha response: ' + captchaResponse.getErrorMessage() + '. Status code: ' + captchaResponse.getStatusCode(), 'CaptchaAjax script include');
                data.captchaResponse = false;
            }
            var successResponse = JSON.parse(captchaResponse.getBody()).success;
            data.captchaResponse = successResponse;
        } catch (ex) {
            gs.logError('Error in processing response from reCAPTCHA: ' + ex.message, 'CaptchaAjax script include');
            data.captchaResponse = false;
        }
    }
})();
In this script, we first get data.sitekey, which is presented on-load to the form, and which the CAPTCHA script uses to retrieve the user’s session ID.
On line 6 though, we check if input exists. If we are executing this function, then input does indeed exist. In this case, the input is what we set in the client controller script (c.data.captchaSession = grecaptcha.getResponse();). Now in the scope of this server script, that data corresponds to input.captchaSession, which I’ve set back to data.captchaSession.
Next, I perform a REST call from the ServiceNow server, to Google’s reCAPTCHA servers, to check if the user has been validated or not. If this throws an error, we log that error and set captchaResponse to false. Otherwise, we set data.captchaResponse to the response we got from the reCAPTCHA servers.
If that seemed a little bit complicated, a “big-picture” view might help. The overall execution goes like this:
- The page (and widget) are requested from the server.
- The server looks up the system property “recaptcha.site-key”, and sets the value to data.sitekey.
- The page (and widget) loads, and the variable data is available. It contains the sitekey property. The reCAPTCHA also loads, as does its associated script and APIs (such as grecaptcha).
- The user clicks the “I am not a robot” button. This performs some validation, and sends some data about the user’s behavior as well as the site key (from data.sitekey) to the reCAPTCHA server.
- The reCAPTCHA server responds with the user’s unique session ID.
- The user clicks the Test button. This sets the c.data.captchaSession property to the value we got as a response from the CAPTCHA server. It then triggers the client-side c.checkCap() function.
- The c.checkCap() function uses c.server.update() to send a request to the server, which also sends along the data object (which contains the captchaSession property we just set) to the server.
- The server sees that there is input, so it runs the script which performs a REST API call to the CAPTCHA server, and checks if the user appears to be a human. It then sets that response to the property data.captchaResponse, which is then passed BACK to the client.
- The client receives the response from the server script, and runs the function in the .then() method, which checks the data.captchaResponse object property, and returns that response.
At that last step, rather than (or perhaps, just before) returning the response value, you might instead want to perform some action like submitting a form or doing whatever it is you want to do when the user validates that they aren’t a robot, and clicks on a given button.
This would be a fair bit easier if you just wanted to use a GlideAjax script include and a UI Page, but alas, the Service Portal does not support GlideAjax.
Downloadable App
Want to install the reCAPTCHA Integration app to your instance/Service Portal, but don’t feel like manually re-typing all that code? Want access to the GlideAjax script include that’ll allow you to integrate reCAPTCHA with a UI Page or UI Macro? We’ve got you covered! Just head over to the reCAPTCHA Integration app page, and click the download link!
Comments