Granting Temporary Roles/Groups in ServiceNow
In today’s article, we’re going to build some new functionality around granting temporary permissions. This will give us the ability to grant users temporary permissions by either directly granting a role, or by adding them to a group temporarily from a user’s profile.
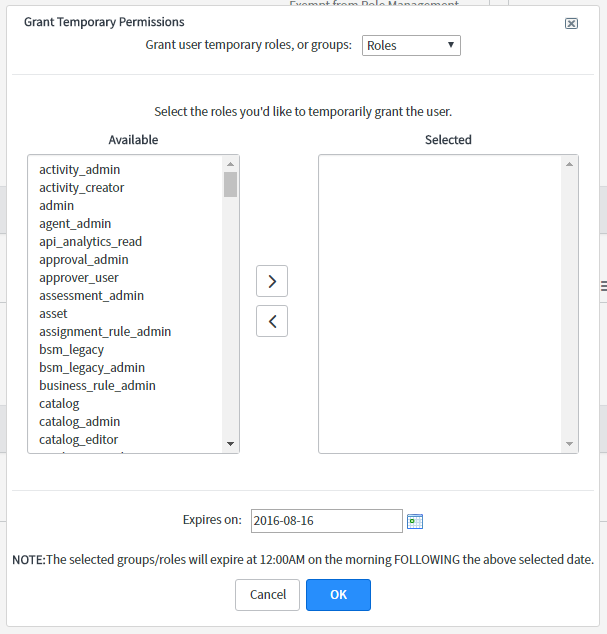 ServiceNow Grant Temporary Roles or Groups
We’re also going to create the ability to bulk-add users, temporarily, to a given group. This could be an assignment group, or a security/permissions group. It could also be a group created specifically for temporarily granting a specific subset of roles.
ServiceNow Grant Temporary Roles or Groups
We’re also going to create the ability to bulk-add users, temporarily, to a given group. This could be an assignment group, or a security/permissions group. It could also be a group created specifically for temporarily granting a specific subset of roles.
We’re also going to allow an Administrator to set a specific expiration date for these temporary permissions.
Finally, for security purposes, we’re going to make it so that users who have temporary versions of the higher permissions roles (admin/security_admin) cannot add the admin or security_admin roles (temporary or permanent) to themselves or other users.
So now that our project requirements are laid out before us, let’s begin!
Note*: If you’re feeling super lazy and just want to download an update set containing this functionality so you can deploy it into your instance already, scroll to the bottom of the article for a link to the Tools page, or find the Grant Temporary Permissions tool under the Tools section in the nav-bar at the top of this page!*
Defining the Fields
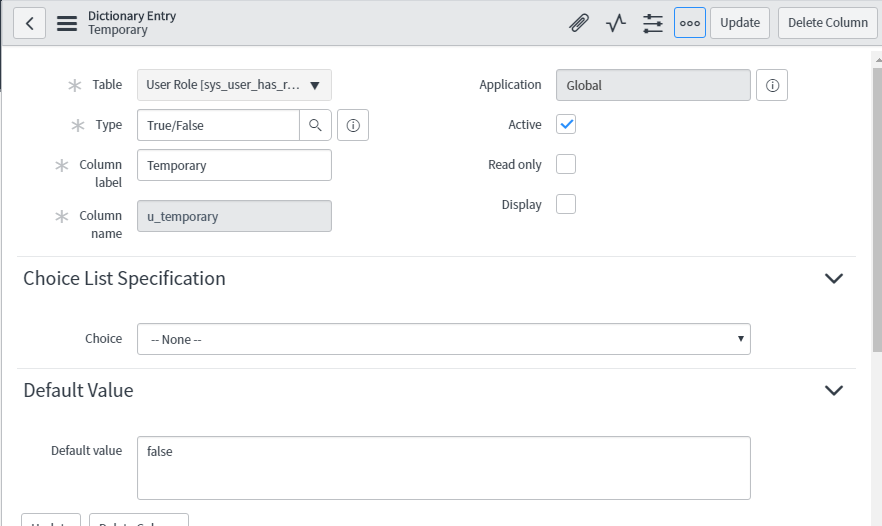
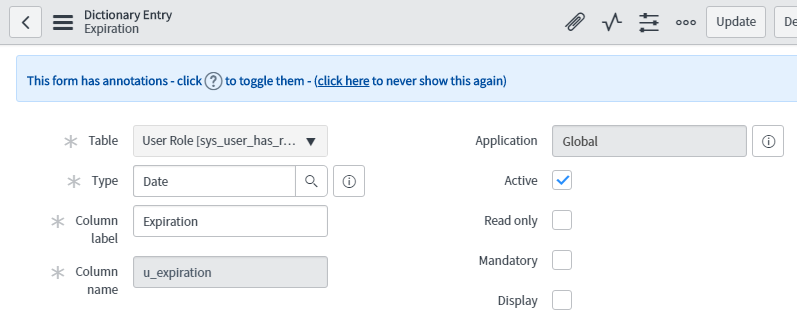
So the first thing we’ll need to do, is add some fields to the sys_user_has_role and sys_user_grmember tables. These are the m2m (many-to-many) tables where the associations between users and roles, and between users and groups are stored, respectively.
We’re going to need to track two key pieces of information: Whether or not the permissions are temporary, and when the expiration date is. So to both of the above table, let’s add those fields.
The Temporary field should be a Boolean (True/False) field, with a default value of False. Here’s how mine is configured:
The Expiration Date field should be a Date field type. Not Date/Time, just Date. Here’s how I’ve configured that one:
Next, just add the same fields to the sys_user_grmember table, and add the new fields to the Roles and Groups related lists on the sys_user table (by right-clicking the header on the groups/roles related lists on a user’s profile and going to Configure -> List Design).
Validating the Data
Since we can assume that all temporary roles/groups must have an expiration date, let’s create a UI Policy that’ll ensure that if the Temporary field is ticked (true) then the Expiration Date field will be both visible and mandatory; but if it is false, then the expiration date should be neither visible, n’or mandatory. And just for good measure (to ensure that no scripts or DOM-manipulation attempts to bypass our UI Policy, we’ll create a Data Policy as well.
Data Policies are simpler than UI Policies, and can easily be converted, so let’s begin by creating our data policy. On the sys_user_has_role table, right-click the header and go to Configure -> Data Policies. On Helsinki, click the hamburger menu at the top-left of the list, and click on Configure and then Data Policies. On the corresponding list of Data Policies, click New.
Give the new Data Policy a friendly short description like Set Expiration Mandatory When Temporary is True. Then, set the Conditions to Temporary, is, true. Tick all the boxes at the top except Inherit: Reverse if false, Active, Apply to import sets, Apply to SOAP, and Use as UI Policy on client.
Save the record, and then create a new Data Policy Rule from the related list at the bottom. Set the Field name to Expiration and set Mandatory to True. It should look something like this:

Click Update to return to the Data Policy record.
Once there, click on the Convert this to UI Policy UI Action. You’ll be taken to a UI Policy record, created with similar conditions and actions to the Data Policy. Now you just need to add one thing piece to the existing UI Policy Action: Set Visible to True. This way (since Reverse if false is turned on), if Temporary is false, then the expiration date will not be shown.
Finally, repeat these steps for the sys_user_has_role table.
Now that we’ve ensured that only acceptable data can be entered into the table, we’re ready to start building our functionality.
Building the Script Include
The first part of this functionality that we’re going to create, is the ability to directly add temporary roles to a given user, or add that user to a group temporarily.
The way we’re going to accomplish that, is by eventually having a UI Action on the sys_user table that only Admins can see. This UI action is going to launch a GlideDialogWindow containing a UI Page that will present the Admin with a list of roles or groups depending on their selection.
Then, once they’ve filled in some roles or groups and an expiration date in the client window, we’ll need to submit those selections to a server-side script that’ll do the work of actually creating the associations between the user, and the roles/groups selected. To accomplish this, we’ll be using GlideAjax. If you haven’t read our article on GlideAjax and callback functions, I strongly recommend that you check it out over here.
Start off by navigating to System Definition -> Script Includes, and creating a new Script Include. I’ve named mine TemporaryPermissions. Make sure you check the Client callable checkbox, and ServiceNow will provide you with a script stub that extends AbstractAjaxProcessor, which is what we need in order to call it using GlideAjax, from a client script (which you may remember from our article on GlideAjax and asynchronous callback functions).
Give the Script Include a nice description, and let’s get started!
Here is my code… It’s a bit of a beast, but I’ve tried to document it thoroughly so you can see what’s going on in there. You’ll also see some notes in the script, that talk about pieces (such as the UI page) that we haven’t created yet. Don’t worry about those. ;-)
You might also notice that some methods/functions begin with an underscore, whereas others do not. Simply put, functions beginning with an underscore are meant to be called only by other, internal code; not from an external API. These functions are “helper” functions that I can call from other parts of my code, to do little bits of work for me over and over.
Finally, you might notice my use of JSDoc notation in the method descriptions. Terms like “@returns {string}”. For more information on JSDoc (which I highly recommend using in any multifunctional code), see here.
var TemporaryPermissions = Class.create();
TemporaryPermissions.prototype = Object.extendsObject(
    AbstractAjaxProcessor, {
        /**
         * Creates temporary group memberships for one user,
         * into one or more groups.
         * @returns {string} a message indicating whether the
         *     groups have been added.
         */
        createTemporaryGroups: function() {
            var successfulGroupAdditions = [];
            var selectedGroups =
                this.getParameter('sysparm_groups');
            selectedGroups = selectedGroups.split(',');
            var userID = this.getParameter('sysparm_userID');
            var expirationDate =
                this.getParameter('sysparm_expiration');

            if (!selectedGroups || !userID || !expirationDate) {
                gs.logError(
                    'Could not find one of the following params: ' +
                    'selectedGroups (' + selectedGroups + '), ' +
                    'userID (' + userID + '), expirationDate (' +
                    expirationDate + ')',
                    'createTemporaryGroups'
                );
                return 'Missing some data. Please be sure to ' +
                    'provide the selected groups, as well as ' +
                    'the expiration date.';
            }

            var groupInsertGR =
                new GlideRecord('sys_user_grmember');
            var workingGroup;

            for (var i = 0; i < selectedGroups.length; i++) {
                workingGroup = selectedGroups[i];
                groupInsertGR.initialize();
                groupInsertGR.setValue('user', userID);
                groupInsertGR.setValue('group', workingGroup);
                groupInsertGR.setValue('u_temporary', 'true');
                groupInsertGR.setValue(
                    'u_expiration', expirationDate
                );
                groupInsertGR.insert();
                successfulGroupAdditions.push(
                    groupInsertGR.group.name
                );
            }

            gs.log(
                'Added user with sys_id ' + userID +
                ' to the following groups: [' +
                successfulGroupAdditions +
                ']. Group membership expires on ' +
                expirationDate + '.'
            );
            return 'Temporary groups granted.';
        },

        /**
         * Creates temporary group memberships for one or more
         * users into a single group.
         * @returns {string} a message indicating which users
         *     were successfully added to the group.
         */
        createTemporaryGroupMemberships: function() {
            var successInsertedUsers = [];
            var groupToAdd =
                this.getParameter('sysparm_groupID');
            var expirationDate =
                this.getParameter('sysparm_expiration');
            var selectedUsers =
                this.getParameter('sysparm_users');

            if (!groupToAdd || !selectedUsers ||
                !expirationDate) {
                gs.logError(
                    'Could not find one of the following params: ' +
                    'groupToAdd (' + groupToAdd + '), ' +
                    'selectedUsers (' + selectedUsers + '), ' +
                    'expirationDate (' + expirationDate + ')',
                    'createTemporaryGroupMemberships'
                );
                return 'Missing some data. Please be sure to ' +
                    'provide the user IDs, as well as ' +
                    'the expiration date.';
            }

            selectedUsers =
                this._trimAndSplit(selectedUsers.toString());
            selectedUsers =
                this._getUserSysIDsFromUserIDs(selectedUsers);

            var groupMembershipInsertGR =
                new GlideRecord('sys_user_grmember');
            var workingUser;

            for (var i = 0; i < selectedUsers.length; i++) {
                workingUser = selectedUsers[i];
                groupMembershipInsertGR.initialize();
                groupMembershipInsertGR.setValue(
                    'user', workingUser
                );
                groupMembershipInsertGR.setValue(
                    'group', groupToAdd
                );
                groupMembershipInsertGR.setValue(
                    'u_temporary', 'true'
                );
                groupMembershipInsertGR.setValue(
                    'u_expiration', expirationDate
                );
                groupMembershipInsertGR.insert();
                successInsertedUsers.push(
                    groupMembershipInsertGR.user.user_name
                );
            }

            gs.log(
                'Added the following users to group ' +
                'with sys_id ' + groupToAdd +
                '. These are the users: [' +
                successInsertedUsers +
                ']. Group memberships expire on ' +
                expirationDate + '.'
            );
            return 'Temporary group memberships added ' +
                'for the following users: ' +
                successInsertedUsers;
        },

        /**
         * Temporarily grants a given user one or more
         * specified roles.
         * @returns {string}
         */
        createTemporaryRoles: function() {
            var successInsertedRoles = [];
            var selectedRoles =
                this.getParameter('sysparm_roles');
            selectedRoles =
                this._trimAndSplit(selectedRoles, ',');
            var userID = this.getParameter('sysparm_userID');
            var expirationDate =
                this.getParameter('sysparm_expiration');

            if (!selectedRoles || !userID || !expirationDate) {
                gs.logError(
                    'Could not find one of the following params: ' +
                    'selectedRoles (' + selectedRoles + '), ' +
                    'userID (' + userID + '), expirationDate (' +
                    expirationDate + ')',
                    'createTemporaryRoles'
                );
                return 'Missing some data. Please be sure to ' +
                    'provide the roles, as well as ' +
                    'the expiration date.';
            }

            var roleInsertGR =
                new GlideRecord('sys_user_has_role');
            var workingRole;

            for (var i = 0; i < selectedRoles.length; i++) {
                workingRole = selectedRoles[i];
                roleInsertGR.initialize();
                roleInsertGR.setValue('user', userID);
                roleInsertGR.setValue('role', workingRole);
                roleInsertGR.setValue('u_temporary', 'true');
                roleInsertGR.setValue(
                    'u_expiration', expirationDate
                );
                roleInsertGR.insert();
                successInsertedRoles.push(
                    roleInsertGR.role.name + ''
                );
            }

            gs.log(
                'Added user with sys_id ' + userID +
                ' to the following roles: [' +
                successInsertedRoles +
                ']. Role access expires on ' +
                expirationDate + '.'
            );
            return 'Temporary roles successfully granted.';
        },

        _getUserSysIDsFromUserIDs: function(userIDs) {
            var foundUsers = [];
            var userSysIDs = [];
            var userGR = new GlideRecord('sys_user');
            userGR.addEncodedQuery(
                'user_nameIN' + userIDs
            );
            userGR.query();
            while (userGR.next()) {
                userSysIDs.push(
                    userGR.getValue('sys_id')
                );
                foundUsers.push(
                    userGR.getValue('user_name')
                );
            }
            return userSysIDs;
        },

        _trimAndSplit: function(str, tok) {
            if (!str) { return; }
            if (!tok || tok.length != 1) { tok = ','; }
            if (str.indexOf(tok) < 0) {
                return [str];
            }
            var ret = [];
            var ara = str.split(tok);
            var ele;
            for (var i = 0; i < ara.length; i++) {
                ele = ara[i];
                ret.push(ele.trim());
            }
            return ret;
        },

        type: 'TemporaryPermissions'
    }
);
Okay, so that’s something of a beast. If you had trouble following what that does, don’t worry. I’ll explain what it expects and returns, when we get around to using it. Speaking of which…
The UI Page
Now that we have our master script built, it’s time to clench up and write some Jelly.
Don’t ask me why I have such an irrational hatred of Jelly. My wife loves it. Not as much as Angular, but it’s up there. I just can’t stand it.
Anyway, let’s start by navigating to System UI -> UI Pages from the Application Navigator, and then clicking New to create a new UI page. Give it a name (I chose grant_temporary_permissions), and a description.
You’ll notice that your new UI page contains 3 primary sections: HTML, Client script, and Processor. Today, we’re just going to be using HTML, and Client script.
Here, I’ll paste the HTML I used, followed by an explanation of the important bits:
At the top, inside the style tags, is just some basic formatting and prettying up of the page, except for line 10 which hides some buttons that show up in the “slush bucket” further down.
Next, we set up a table to contain most of the elements we’re going to be working with, because this is the easiest way I could think of for someone like me who knows little about design, to get things to line up properly. 😎
In the first row, we have an element which asks the admin whether he or she would like to grant temporary roles, or temporary groups to the selected user. This also happens to be the only element which is visible when the UI page initially loads.
I’m using the autofocus attribute to ensure that this is the first thing that the admin has selected when the UI page loads, and the onchange attribute to call a function in my client script (selectBoxChanged())when the value changes. As you’ll see later on, this function basically just displays the appropriate elements below the select box, depending on what was selected.
The next rows in the table contain two columns: One for if the admin selects Roles (meaning they’d like to grant the selected user temporary roles), and one for if they select Groups. These elements both contain a UI Macro called ui_slushbucket.
Next is a date field, which uses the ui_date UI Macro, and finally, we’ve got the buttons (UI Macro: dialog_buttons_ok_cancel). When OK is clicked, it runs the function mKay(). When cancel is clicked, it runs nope(). Both of these functions are in the client script.
Speaking of the client script, here it is:

As you can see, the first thing we do is clear both “slush buckets”. They shouldn’t contain any data, but we do this just to be safe. Next, we call the internal _getRolesForSlush() and _getGroupsForSlush() functions. Since they’re both very similar, so I’ll just go over _getRolesForSlush().
Pro Tip: Though we couldn’t find documentation on this anywhere, client-side queries seem to have a default maximum of 500 records. Changing the “glide.db.max_view_records” property doesn’t seem to affect this until you hit the 10,000 default limit of that property. Instead, to return more records (if you have more than 500 roles/groups), we could use “.setLimit(n)” before our query.
Essentially, what the _getRolesForSlush() function is doing, is making an asynchronous GlideRecord query to get a list of all roles, in alphabetical order. It then passes the result _rolesCallBack(), which adds each role as an option on the left side of the roles “slush bucket”. This populates the list of roles for the admin to select from.
Pro Tip: If you wanted to be extra clever here, you could make another function that got a list of all the roles the user currently has, and filter them out from the returned roles!
At this point, imagine an admin visits a user’s profile, clicks the “Grant temporary access” UI action, and this page loads. The admin selects “Roles” from the drop-down list, double-clicks a few roles from the list, and sets an expiration date of today (which is the default). Finally, the admin clicks the OK button. —
What happens next, is the client script function mKay() is run. This function checks what type of permissions the admin requested (roles or groups), and calls the appropriate helper function. The helper function gets the selected roles/groups, and makes a GlideAjax call to our script include to create those roles using the createTemporaryRoles method.
Finally, the helper function asynchronously (for performance reasons) passes the results of creating the temporary roles to another function (_showResultsCB()), which shows the results of the GlideAjax call on the admin’s screen.
Note: I’m using a modified version of the ClientDateTimeUtils script include, which you can find on the community site, here. You can see my modified version in the update set at the bottom of this article.
The UI Action
Now we’ve got to create the button that launches the UI page. Since we’ve already built all of the logic to do all the work, that’s pretty much all that this little button has to do. So navigate to a user record on the sys_user table, right-click the header and go to Configure -> UI Actions.
Create a new UI action with a name like Grant Temporary Permissions, or whatever you like. Give it an action name like temporary_roles, and tick the Form link box. Set Onclick to showTemporaryPermissionsDialog(), and make sure the Condition says gs.hasRole(‘admin’);, so non-admins can’t see the UI action. Finally, fill in the script:
All that this script has to do, is set the size and title of the GlideDialogWindow, and render it. The scripts we built before, will do the rest.
Preventing Abuse
It might immediately occur to the more security-conscious of you, that a user with a temporary admin role, could easily grant themselves or others, permanent admin. In order to limit that, I’ve also created a business rule on the sys_user_has_role table. The BR runs before insert or update, and the conditions are Role is admin or Role is security_admin, and the script (below) just ensures that the user has some non-temporary version of the Admin role:
This could’ve been written a little more succinctly, but I think it would’ve made it less clear. Basically, we’re just checking that the user has a non-temporary version of the admin/security_admin role, before allowing them to grant or update higher-level permissions for themselves or others.
Note: This protection is really designed to prevent people from accidentally adding permanent or temporary admin roles. It can be bypassed by users with the temporary admin/security_admin role. Whenever you grant an Admin role - temporary or not - there is an implied level of trust. Do not grant high-permissions roles to users that you cannot trust to use them wisely!
Although in the update set at the end of this article, you’ll find additional functionality (such as the ability to bulk-add a list of users to a group by User ID), this article has become quite long already, so the last piece of the puzzle that we’ll go over is the lynchpin to this whole scheme: The scheduled job that revokes temporary roles once they’ve expired!
Pro Tip: Don’t forget that scheduled jobs don’t get captured in update sets by default, so be sure to force this into an update set or export/import if you plan to move this from Dev to Prod!
In the Application Navigator, head over to System Definition -> Scheduled Jobs, and click New. On the Interceptor page, click Automatically run a script of your choosing.
Give it a good name, then make sure that Run is set to Daily, and that Time is set to 1 minute after midnight (00:01:00). Though scheduled jobs don’t always execute at exactly the same time, this ensures that it will at least run after midnight each morning.
Finally, here’s the script:
// Revoke expired temporary roles
var grRoles = new GlideRecord('sys_user_has_role');
grRoles.addQuery('u_temporary', true);
grRoles.addQuery('u_expiration', '<', gs.nowDateTime());
grRoles.query();
while (grRoles.next()) {
    grRoles.deleteRecord();
}

// Revoke expired temporary group memberships
var grGroups = new GlideRecord('sys_user_grmember');
grGroups.addQuery('u_temporary', true);
grGroups.addQuery('u_expiration', '<', gs.nowDateTime());
grGroups.query();
while (grGroups.next()) {
    grGroups.deleteRecord();
}
This script checks for temporary permissive records in the sys_user_grmember, and sys_user_has_role tables, where the expiration date is earlier than now. So if the expiration date is today, then today is the last day that I’ll be able to use these permissions. Some time very shortly after midnight tonight, these permissions will be revoked.
And that’s the last piece! Don’t hesitate to download the update set linked at the bottom of this article if you’d like to try this functionality out on your own instance, but I hope my explanations have clarified how this sort of thing can work!
SN Pro Tip*: As with all of our free tools (available from the Tools heading in the nav-bar at the top of this page), there are no advertisements, no nags, no “pro versions”, and no credit card or other info required.
Just a simple download link for an un-obfuscated update set that you can inspect and deploy into your own instance, for free.*
Why? Well, just because we like you, and we want to thank you for having a look at our humble website. We do hope you’ll consider us for any ServiceNow development/admin/architect work that your company needs done, but that’s not a requirement. No strings attached. Really.
Click here to go to this tool’s page, and download the latest version!
Comments